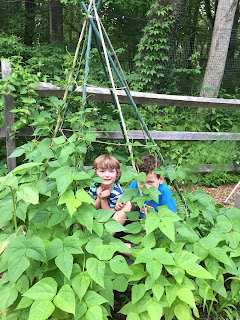
These Bean Teepees are great way to get kids learning in a fun hands on way. Beans are an ideal way to start gardening with children, the beans are easy to handle when planting, the plants grow quickly and the pole beans used for a teepee get so tall its fun for the kids to measure their growth. Plus at the end you will have the added bonus of having a nice green vegetable your children can pick and eat in salads or cooked.
We added a second part to the bean growing project indoors on a windowsill so that they could really see what was happening below the soil to the beans and gain a really good understanding as to how the beans germinate underground.
To create a bean teepee you will need:
6-8 long garden stakes
packet of pole beans
String
A sunny spot in your yard
Step 1
With the children, and in a sunny spot work over an area of soil. Ours was a raised bed approximately 4x4ft but anywhere that makes sense in your yard will work. Just keep in mind that the larger an area you dig over the longer the poles will need to be to get the height in the center of the finished teepee. My children will dig for hours in the dirt so while they worked over the soil I was able to get planting in my other raised beds. They helped dig them over too!
Step 2
Once they had had enough digging we positioned the poles around in a circle over the worked soil. Place one pole in each corner and then add extras in the middle where needed. Make sure you leave a wider space at one point on your teepee to enter and exit the teepee. Lean the poles inwards and secure at the top where they meet with string.
Step 3
At the base of each pole we made four small holes and planted about 3 or 4 beans per the packets instructions. Now we just need to wait for some warmer weather to help these grow. Be sure to water frequently and have your children come to measure how there plants are growing. In the center of our Teepee I laid some stone tiles that I had but this is optional, you could use mulch, straw or even a small chair depending on the size of your Teepee to give your child somewhere dry to sit.
Step 4
It wasn't long before we had small green shoots peeking through the soil.
The kids started measuring them and this is the great thing about beans, if the weather is warm they often grow by the day. I think I might hide in here too on hot sunny days.
Don't have a back yard large enough for a Teepee? Kids can still explore the wonder of growing a bean with this indoor project we set up at the same time as planting our Teepee. This project is a great way at letting the kids see what happens to a seed after it is planted in the soil; something that they don't usually get to witness.
Jack and the Beanstalk
You will need:
A glass jar or clear plastic cup
Two beans (just in case one decides not to grow)
Kitchen paper towel
Water
Sharpie
Optional for addition of a castle:
Wooden Peg
Elmers glue
Paper
Take the plastic cup, fold a sheet or two of paper towel in half and fold around your hand. Now place this inside the cup, it should stand around the inside of the container leaving the center empty. Now between the paper and the plastic container push two beans (we did ours either side of the cup). Now mark the cup at 1 inch intervals so you can record how quickly your bean grows. In addition we created a castle from paper and glued it to a peg and clipped it to the top of the container. Now add a small amount of water so that the kitchen paper becomes wet and place in a sunny location.
As the seed begins to grow the children can have fun watching the different stages.
As the summer progresses be sure to check for beans.
To create a bean teepee you will need:
6-8 long garden stakes
packet of pole beans
String
A sunny spot in your yard
Step 1
With the children, and in a sunny spot work over an area of soil. Ours was a raised bed approximately 4x4ft but anywhere that makes sense in your yard will work. Just keep in mind that the larger an area you dig over the longer the poles will need to be to get the height in the center of the finished teepee. My children will dig for hours in the dirt so while they worked over the soil I was able to get planting in my other raised beds. They helped dig them over too!
Step 2
Once they had had enough digging we positioned the poles around in a circle over the worked soil. Place one pole in each corner and then add extras in the middle where needed. Make sure you leave a wider space at one point on your teepee to enter and exit the teepee. Lean the poles inwards and secure at the top where they meet with string.
Step 3
At the base of each pole we made four small holes and planted about 3 or 4 beans per the packets instructions. Now we just need to wait for some warmer weather to help these grow. Be sure to water frequently and have your children come to measure how there plants are growing. In the center of our Teepee I laid some stone tiles that I had but this is optional, you could use mulch, straw or even a small chair depending on the size of your Teepee to give your child somewhere dry to sit.
Step 4
It wasn't long before we had small green shoots peeking through the soil.
The kids started measuring them and this is the great thing about beans, if the weather is warm they often grow by the day. I think I might hide in here too on hot sunny days.
Don't have a back yard large enough for a Teepee? Kids can still explore the wonder of growing a bean with this indoor project we set up at the same time as planting our Teepee. This project is a great way at letting the kids see what happens to a seed after it is planted in the soil; something that they don't usually get to witness.
Jack and the Beanstalk
You will need:
A glass jar or clear plastic cup
Two beans (just in case one decides not to grow)
Kitchen paper towel
Water
Sharpie
Optional for addition of a castle:
Wooden Peg
Elmers glue
Paper
Take the plastic cup, fold a sheet or two of paper towel in half and fold around your hand. Now place this inside the cup, it should stand around the inside of the container leaving the center empty. Now between the paper and the plastic container push two beans (we did ours either side of the cup). Now mark the cup at 1 inch intervals so you can record how quickly your bean grows. In addition we created a castle from paper and glued it to a peg and clipped it to the top of the container. Now add a small amount of water so that the kitchen paper becomes wet and place in a sunny location.
As the seed begins to grow the children can have fun watching the different stages.
Once the leaves reach the castle you can transplant your seed outside to your yard in your teepee or even into a large container with soil just remember to add a pole for it to climb and keep measuring.
As the summer progresses be sure to check for beans.
We love this recipe for green bean salad,
1 lb Green beans
1 cup cherry tomatoes (home grown or from our favorite local farm are best)
1/2 small red onion chopped
Crumbled feta cheese
Dressing: Mix equal parts balsamic, fresh lemon juice and olive oil. A little crushed garlic and some salt and pepper.
Enjoy!
1 lb Green beans
1 cup cherry tomatoes (home grown or from our favorite local farm are best)
1/2 small red onion chopped
Crumbled feta cheese
Dressing: Mix equal parts balsamic, fresh lemon juice and olive oil. A little crushed garlic and some salt and pepper.
Enjoy!


