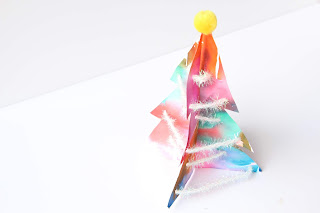
These bright and colorful trees were created as our contribution to 'Craftmas 2018'. If you haven't heard about Craftmas let me fill you in a minute, its 12 days, 24 creative bloggers getting together to bring you all the Holiday crafting you'll need to get you through the season over on Instagram.
I began by thinking we would create a 3D threading Christmas tree but as we began playing around it was fun to take his project into a couple of different directions so I'm going to share all three simple ways to decorate your 3D tree below. Pick your favorite or make all three!
You will need:
Colored or white card stock paper
Scissors
Glue
Cut out our Tree template
Depending on which tree:
Colorful washi tape
Sequins / Pom poms
Bleeding tissue paper
Ribbon/parcel string
Tree type 1 - invitation to decorate a tree
Using the tree template cut the two tree pieces out of some green card. Cut one tree up from the bottom and the other down from the top, so that they can be slotted together.
Give your little one something to decorate the trees with sequins, buttons, beads, pom poms etc and some glue. Decorate one side of each tree and then when they are dry flip them over. to do the other side.
Once dry slot the two pieces together and top by gluing a pom pom onto the top.
Tree type 2 - Washi tape Christmas tree
We chose to use some plain colored washi tape to create a warm colored (red, orange,yellow) and cold colored (blue, green, purple). But any wash tape would look pretty.To begin take a piece of white cardstock, tape all over one side.
Once one side is covered flip it over and tape the other side.
Once the two sides are covered in tape use the tree templates to cut out two tree shapes from the taped up card.
Again cut a slit up from the bottom in one tree and down from the top on the other, then slot the two pieces together.
Don't forget to add a star aka Pom Pom to the top of your tree
Tree type 3 - Bleeding tissue paper trees
For our final tree I broke out the bleeding tissue paper, this is always a fun one with the kids, they love the magic of the dye transferring to the paper with the addition of water. I precut the tissue paper into squares and once again sorted it by warm and cold colors - totally optional but by sticking to color families it helps to avoid 'muddy' end results.Have the children paint one side of the card paper with water, then lay the tissue paper squares onto the wet paper. Once it is dry remove the squares, flip the sheet of paper over and repeat on the opposite side.
On this 3D tree we also punched holes around the edge of the tree, one in each corner and one at the center of each triangle. Once you have made the holes slide the two pieces together again.
Take your decorative yarn or parcel string and have your child thread around the holes in the tree, this is a great exercise in fine motor. When they are all done threading add a pom pom to the top of your tree and your all done.
Which one is your favorite? I think its so hard to pick just one I recommend making a whole forest of colorful christmas trees.
Be sure to check out the rest of the Craftmas fun over on Instagram, and thats us wishing
Merry Craftmas to all!


