Tuesday, April 2, 2019

Easter Bunny Boxes


So excited to be back sharing with another Spring project for HOP FEST this year. If you haven't come across this springtastic event its a bunch of wickedly awesome bloggers who have come together on Instagram to bring you 2 weeks of some of the best spring-easter crafty goodness that there is.

Our contribution this April is an Easter bunny treat box to decorate. We have included a template to decorate, we give a simple process art suggestion but really anything goes and these sweet little boxes finished will not disappoint. So please have a go at making your own bunny box and please hop on over to Instagram to see all the other goodness on offer with HOP Fest.


You will need:


  • White card stock
  • Bunny Box template
  • Oil pastels or crayons (Or used alternate process artwork)
  • Watercolor Paints
  • Scissors
  • Treats to put inside your box when finished - not pictured


Step 1


Have your child create some pretty easter paper. We chose to play with pastel colored oil pastels and watercolor paints. I had the children draw designs onto the paper using the oil pastels to begin with (crayons would work too) and then when they were done doodling I asked them to cover over their entire paper with a wash of color.


This is a simple resist painting process set it aside to dry, you will need one sheet per box that you create. Alternatively you could also recycle old artwork lying around so long as it was painted on thicker paper or card stock. 

Step 2


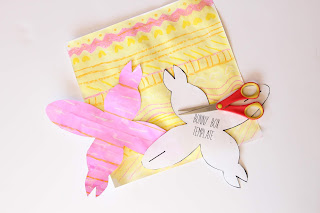
Print and cut out the Blue Barn Bunny box template which you can find here.


Step 3

Using the template you have printed and cut trace the outline onto the painted paper. I like to trace it onto the back side of the paper so that any lines left after cutting won't show on the final box.


You could also trace the outline directly onto white card stock, we also tried this way and I had the children draw bunny faces under the ears part of the template. After drawing our faces with the oil pastels they used liquid watercolors to splatter paint the bunnies before we cut them out.


Step 4

Once you have cut out the painted bunny templates you can start to assemble your box. Make sure you have cut the two slits marked on the template you will need these to assemble.  If you find fitting the ears through the hole a little tricky you may need to make the slit a little longer.


I found it easier if you folded each flap over ahead of the assembly of the box to create a crease before trying to pull the box together.


Now simply push the two sets of ears through one of the sides with a slit in it.


Fill your box with its treat and then fold up the last side, threading the ears through to secure the box.


Step 5

Decorate your boxes with any extra bits and bobs you may like, a pom pom nose and googley eyes, or maybe sequins and glitter.


You may want to attach ribbon to the ears and hang them from some spring branches as a pretty easter themed tree.


Or just give out as little treat boxes. These make great treat boxes for teachers to create with their classes or to give to a whole group of friends.



Thursday, January 17, 2019

Valentines Sunglasses


We created these fun shades for last years Red Ted Art Valentines extravaganza and they are too cute not to share again here this year. Plus I love looking back at my kiddos silly faces so here goes...

When it comes to my kids and Valentines I like easy, fun and not too expensive to replicate for their 20 classmates, this project checked all the boxes, and seriously who wouldn't look super cool in these fab Valentines shades?  Ok so on with the making.


To make these glasses you will need:

Thin cardboard - a cereal box works great
Print our Sunglasses PDF here
Glue
Pipe cleaners
Anything you have to decorate with, stickers, pens, wash tape, gems, buttons, pom poms or glitter to give you a few examples.


Step 1

Cut up the side of a cereal packet. Print out the PDF printable and glue to the inside of the cereal box. Set aside to dry (Its much easier to cut out once the glue is dry).


Step 2

Taking scissors or an exacto knife cut around the edge of the pink glasses, cut the white centers out too - kids will probably need a grown up to do this step.


At this point its a good idea to also make a hole at the edge of each eye this will be used to thread the pipe cleaners through at the end.

Step 3

Once your glasses are cut out you can leave your kiddos a selection of Valentine colored decorations to decorate with. Depending on how much mess you want to clean up you can leave out anything from stickers to paint and glitter. We like the Kwik Stix for their creamy pain texture without having to wait for them to dry and they are super easy even for little hands to use.

If you use pom poms you will have to leave the glasses flat to dry before you pick them up to add the arms.


Step 4

To add the arms we used two pipe cleaners. Take two (different colors is fun) and twist them together as shown in the picture below. Then once your done twisting take some scissors and cut the length of the twisted pipe cleaners in half. Curl one end in a large loop and the other in a small loop - you are going to hook the small loop through the hole in glasses frame and the larger loop will hook over your child's ears.


And thats it, your Valentine is ready just pop them on and give them a kiss!


Happy Valentines


Tuesday, December 4, 2018

3D Christmas trees decorated three ways


These bright and colorful trees were created as our contribution to 'Craftmas 2018'.  If you haven't heard about Craftmas let me fill you in a minute, its 12 days, 24 creative bloggers getting together to bring you all the Holiday crafting you'll need to get you through the season over on Instagram.  

I began by thinking we would create a 3D threading Christmas tree but as we began playing around it was fun to take his project into a couple of different directions so I'm going to share all three simple ways to decorate your 3D tree below. Pick your favorite or make all three!

You will need:


Colored or white card stock paper
Scissors
Glue
Cut out our Tree template


Depending on which tree:

Colorful washi tape
Sequins / Pom poms
Bleeding tissue paper
Ribbon/parcel string


Tree type 1 - invitation to decorate a tree

Using the tree template cut the two tree pieces out of some green card. Cut one tree up from the bottom and the other down from the top, so that they can be slotted together.  


Give your little one something to decorate the trees with sequins, buttons, beads, pom poms etc and some glue. Decorate one side of each tree and then when they are dry flip them over. to do the other side.


Once dry slot the two pieces together and top by gluing a pom pom onto the top.


Tree type 2 - Washi tape Christmas tree

We chose to use some plain colored washi tape to create a warm colored (red, orange,yellow) and cold colored (blue, green, purple). But any wash tape would look pretty.

To begin take a piece of white cardstock, tape all over one side.


Once one side is covered flip it over and tape the other side.


Once the two sides are covered in tape use the tree templates to cut out two tree shapes from the taped up card.


Again cut a slit up from the bottom in one tree and down from the top on the other, then slot the two pieces together.


Don't forget to add a star aka Pom Pom to the top of your tree


Tree type 3 - Bleeding tissue paper trees

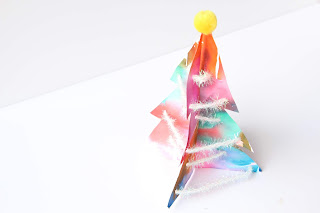
 For our final tree I broke out the bleeding tissue paper, this is always a fun one with the kids, they love the magic of the dye transferring to the paper with the addition of water.  I precut the tissue paper into squares and once again sorted it by warm and cold colors - totally optional but by sticking to color families it helps to avoid 'muddy' end results.

Have the children paint one side of the card paper with water, then lay the tissue paper squares onto the wet paper. Once it is dry remove the squares, flip the sheet of paper over and repeat on the opposite side.


 Once both sides are dry and you have removed all the tissue paper you should be left with some pretty marbled looking paper. Lay the tree templates over the dyed paper card stock and cut out two tree shapes. Remember to make one cut on each again - one up from the bottom and the other down from the top.


On this 3D tree we also punched holes around the edge of the tree, one in each corner and one at the center of each triangle. Once you have made the holes slide the two pieces together again.


Take your decorative yarn or parcel string and have your child thread around the holes in the tree, this is a great exercise in fine motor. When they are all done threading add a pom pom to the top of your tree and your all done.  


Which one is your favorite? I think its so hard to pick just one I recommend making a whole forest of colorful christmas trees.


Be sure to check out the rest of the Craftmas fun over on Instagram, and thats us wishing 
Merry Craftmas to all!