Sunday, April 27, 2014

Goggly Eyed Grass Heads


I remember growing a grass head as a child, trimming the hair and giving it hairstyles. I actually think it was one of the first indoor plants I was in charge of, that or a cactus. We decided to try making them ourselves, the kids all wanted to have their own head to style. I must say I think they would all be dead if I hadn't kept up the watering.


You will need:


Nylon stocking
Soil
Grass seed
Googly Eyes
Pipe cleaner
Small pot
Elastic band (We used a rainbow loom band)

Step 1

Take a stocking and trim to about 6 inches in length. 


Open up the stocking and try to widen it into a circle so that you can put a layer of grass seed at the closed end.


 Step 2

Take a cupful of soil and add it on top of the grass seed. You can kind of mold it around inside the stocking to create a longer or rounder face to your grass head.


Tie a knot in the open end of the stocking.


Step 3

Pinch a small amount of the soil about halfway down and twist to form small ball, this is going to be the nose, twist a small rubber band around to hold the hose in place.


Step 4

Glue on googly eyes and a pipe cleaner mouth (Or any other things you have to create a face, maybe button eyes or string for the mouth). Stand your head in the pot and water and wait for grass to grow.


We soaked our heads by submerging them in water the first watering, then leaving them sitting in a small pot of water from then after. The knot in the tights helps to suck up the water from the container. If your glue is water based it might lead to eyes falling off with frequent watering (a hot glue gun is best).

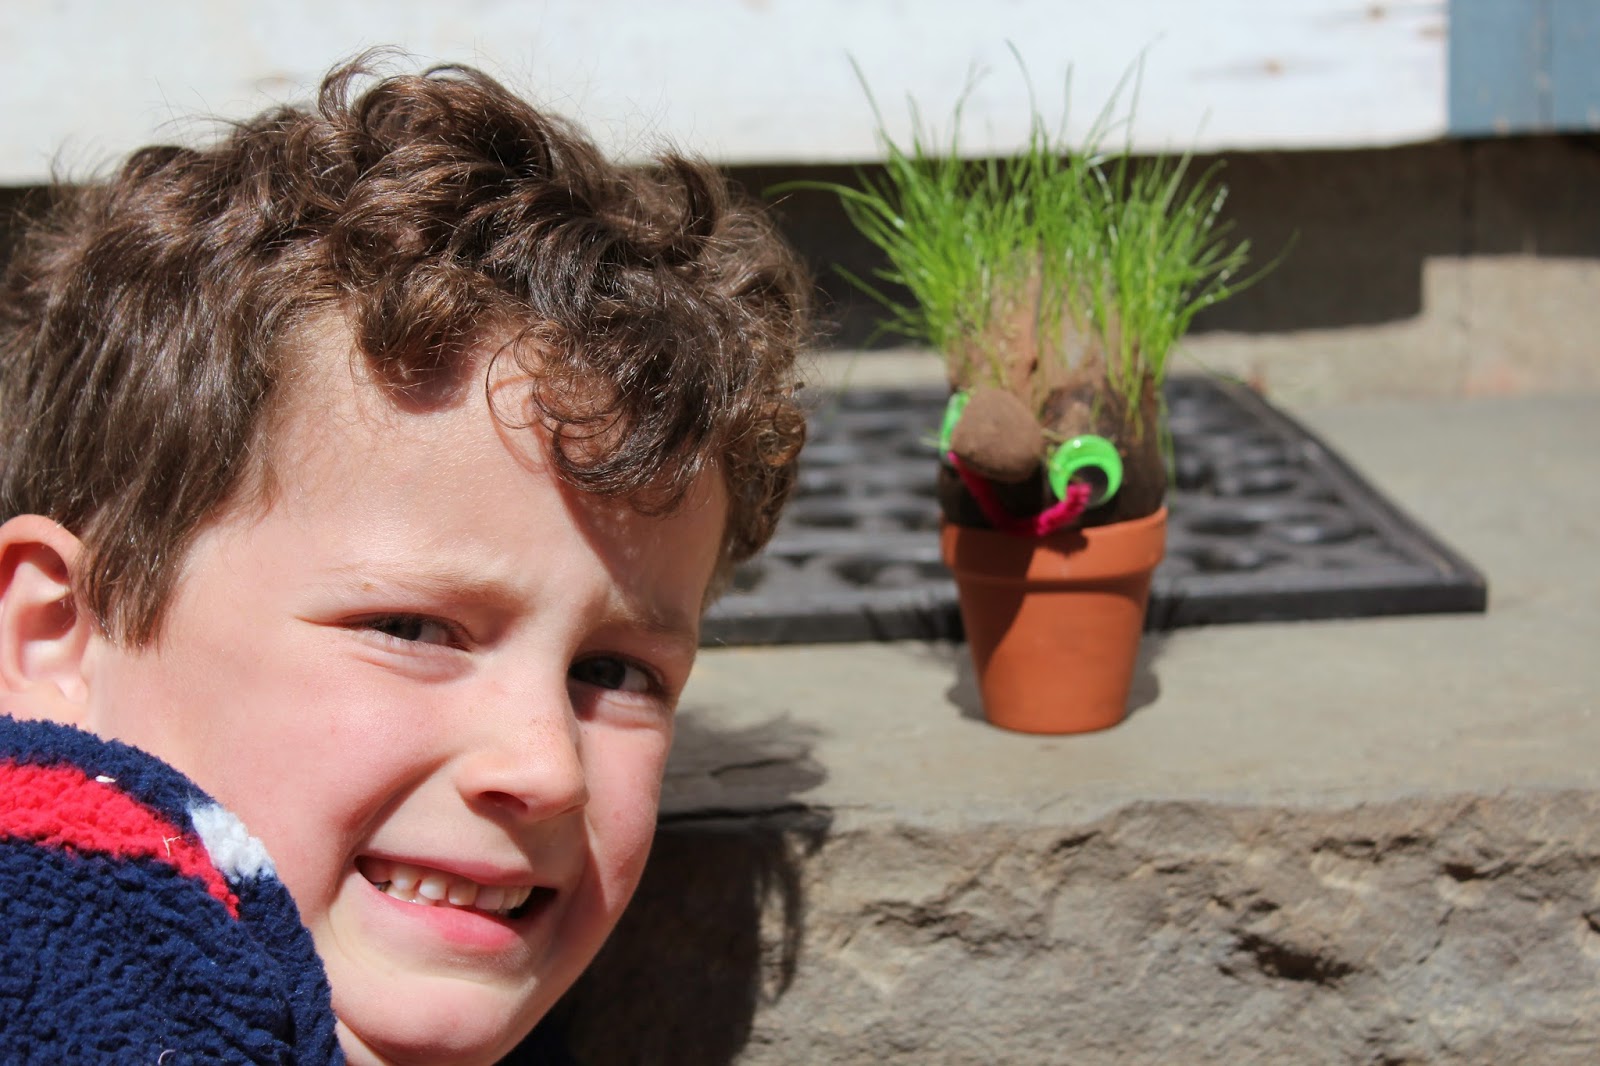
Sit your grass heads on a sunny windowsill and keep watering, within 2 weeks you should have hair to trim and style.


Ours have even had a few trips outside to enjoy the warmer spring weather.


Meet Bubas...his name is lightening!


Wednesday, April 23, 2014

Jello Play Dough

So my wonderful intentions today were to finish up my grass heads post and share it with you all. The grass has grown and I am almost ready; but for spring, it sprang, and reminded me I needed to get myself out and take care of some of the million jobs that seem to have been added to my to do list. After spending a good few hours outside in the yard with my littlest he was not prepared to watch me type but instead 'had to' do play dough RIGHT NOW...You get the drift. Anyway, I decided if he wanted it that bad he could help make the play dough. So he did.

About a year ago I discovered the wonders of no cook dough and I've been experimenting ever since it's SO easy (it really is), it's so easy my 3 year old can make it and heres how.


You will need:

1 Cup flour
1/4 Cup Salt
2 tbls Cream of Tartar (Found in the spices isle of the supermarket)
2 tbls Oil
1 packet sugar free Jello (Needs to be sugar free)
1 Cup boiling water


Step 1 and only step this takes minutes

Heres my secret to the smoothest, easiest play dough, my blender. Measure and pour out all the ingredients into the blender, finish with the boiling water. If you don't have a blender you can mix it the old way with a bit of elbow grease it will just take longer. D did it all apart from the boiling water which I did. 


He was very happy when he opened the Jello box 'all by myself'.


But the best bit was driving the blender.


And thats it, scrape it out the bowl and play. If you feel its too dry add oil, too wet add a little more salt (I try to keep that on the low side as it dries your hands so much).


I didn't even wash out the bowl between colors, just repeat the process adding a different flavor Jello mix. Having the different flavors adds to the smell sensory fun. I liked the lime but D preferred strawberry. Anyone for cupcakes?


So easy a 3 year old can do it.


Monday, April 14, 2014

Recycled 'scrap' book

I don't know about you but when it comes to my girls they are always writing; stories, notes, maps, poems, class lists...you get the idea. They love notepads and small books to write in. After receiving a lot of packaging paper in my Amazon delivery this week the environmentalist in me couldn't just throw it out so I folded it and came up with this. 


I loved this project because it was totally free and 100% recycled, what more could you ask for with Earth day approaching. 

You will need:

2 sides of an old cereal or cracker box
Plain scrap paper/packaging paper
Ribbon (from an old gift if you can) 
Fabric (We used an old skirt of the girls)
Glue
Hole punch


Step 1

So the scrap paper I used was from a long sheet of packing paper. We folded the scrap paper in half and trimmed it to the size we wanted. We repeated this a number of times to create enough pages for the book.


Step 2

Next we applied glue to the cracker box sides and glued on fabric, be sure to cut the fabric a little larger than the size of cardboard that you are covering. Cut a diagonal across the corners so that you can glue and fold over the overlap.


Step 3

Once the glue is dry make two hole punches through one of the pieces of fabric covered card. Now use this to make the point for the hole punches in the scrap paper and the other piece of fabric covered card which will become the back of the book.


Step 4

Place all the pieces together, back, paper sheets and front side. Thread the ribbon through from back to front. Tie in a bow. 


At this point if you want you could decorate the front of your book further with scrap book supplies, or better still recycled materials otherwise headed for land fill.


We are now on guard for the next Amazon delivery of packing paper.


Saturday, April 12, 2014

Milk Jug Mobile

This project is a great because its another use for those gallon milk jugs, and in this house we get through a lot of them. Other than the sharpies its pretty much free and it can take whatever interests your child as its theme. You could also use these as sun catchers if you prefer, just stick them in your window instead of threading them up.


You will need:

Empty milk bottle
Scissors
Sharpies
String, thread or yarn
2 wooden dowels or small straight twigs


Step 1

Cut out the plastic sides of the milk jug. Take a black sharpie and outline the shape that you wish to have. We found some butterfly templates online to copy which made it easier and the kids also decided to draw around some of my cookie cutters.


Step 2

Color. Using sharpies color in your designs.


Step 3

Cut out your pictures carefully, we left a little boarder around the outside of each object we were cutting out. My five year old needed help with this part because the plastic is a little harder to cut than paper. Once you have cut them out use a hole punch to make a hole in each so that you can thread it to hang. Make sure you make the hole at the top of each object thinking about how it will hang.


My kids discovered they could aim and fire this across the kitchen which became a game in itself.


Step 4

Tie the two sticks together in the center to create a cross, you can slide the sticks later to ensure it hangs straight.


Once you have tied the sticks you can tie the milk jug pictures to them.We had each drawn five items and hung one on each end and one in the center.


Enjoy, they are so pretty especially when they catch the light. I enjoy that the kids all came up with very different themes and how well they all turned out.


Thursday, April 10, 2014

Wild Flower Seed Bombs

It seems like you can't read an environmental article these days without hearing about the importance of bees and how through peoples land mismanagement, pollution, pesticides etc bees are dying off. This project is a great friend to the bee and best of all even your 2 year old can help.

The kids at the Blue Barn set about making 'Seed Bombs'. These can be made by anyone old enough to squish play dough and not eat it. Once made they can be placed in an egg box and wrapped as a gift (best put a note into explain!). You could also go guerrilla warfare around your neighborhood and throw the bombs into areas of wasteland to encourage wild flowers back or you could just forget about them somewhere in your own yard and see what blooms.


You will need:

Wild flower seeds
Compost
Clay soil or Crayola air dry clay
Water
An egg box


Step 1

Take it outside. You may laugh but I was going to make these with the kids at my kitchen table, we only went out because it was such a perfect day. I am glad I did while easy and fun if you mix kids and dirt you know its gonna get messy.

Mix 1 part seeds to 1 part compost and 3 parts clay plus some water to bind. The kids did this all by themselves with my half cup measure, we did end up get a little carried away with who was adding what so this is a rough estimate but as you mix you can add more of what you need.


Step 2

Get dirty. Time to roll up your sleeves and knead the dough into the compost and seeds.


Step 3

Once the mixture is well combined start to mold into egg size balls and put into an empty egg box.


Once they have dried a bit go 'bombing' and help bring back the flowers for the bees. How far can you throw a seed bomb?