Friday, September 25, 2015

Acorn Fairies

Earlier this week an article popped up in my Facebook feed highlighting that in the UK they have removed unused words from the Junior Oxford Dictionary to replace them with more well used words. As I read the list of words removed I was so sad to think that we now live in a world where words like Acorn, Dandelion and Otter are deemed not necessary for 4-11 year olds and instead these words have been replaced by 'MP3 player', 'chat room' and 'cut and paste'.

I sat there for a minute dumbfounded at what I'd read. I googled a bit just to make sure it wasn't a hoax but after a little collaboration I came to the sad realization that it was true. I grabbed the kids, took them out in the woods and we searched for Acorns. I wanted to be quite certain that my kids would know what an Acorn was long before they knew what a chatroom was.

Luckily for me I was pleasantly surprised. My four year old already knew what an Acorn was and better than that informed us all he knew the best place in the woods to find Acorns. He was absolutely right. We had a fabulous morning foraging around. We also came across a big toad, watched a Hawk land in a tree and collected a million leaves that are currently going dried and crispy in my car. It was all worth it. But what to do with all the Acorns?


These colorful little creations were a collaboration between myself and my daughters who are fairy crazy. As they get older I keep thinking there will come a time when they don't love fairies quite as much, but in this instance I'm not sure the apples fell far from the tree. I mean who doesn't love the idea of fairies, and the magical gardens they bring with them. Plus after our morning in the woods we were ready to embrace the natural magic of fairies.


You will need:

Acorns (Make sure you don't collect any with holes, Weevils like to make their homes in the acorns. To make sure we had no bugs we dried ours in the oven at 170F for about 40min).
Wooden skewer
Paint
Fabric flower petals (We pulled apart some fake flowers and leis but you could also buy the klutz fairy making kit)
Flower arranging twine or thin wire
Embroidery thread
Glue
Sharpies


Step 1

Push the acorn onto the sharp end of the skewer. Be careful this step requires adult help. Paint the acorn  to become the fairies face. Leave to one side to dry we found standing the skewers in a cup of rice was the perfect way to keep them in place whilst they dried.


Step 2

Once the paint is dry, take one of the flower petals and push it onto the skewer. 


Underneath loop around a length of the flower arranging twine. This will become the arms of the fairy.


Use a small spot of glue to hold the petal down over the wire. This will help to keep it all in place.


Next, push on one or two more petals to become the skirt. In the same way take a piece of flower wire and twist around under the skirt; this will become the legs. Hold in place with a little glue.


Step 3

Wrap embroidery thread around the ends of the wire to become hands and feet. Draw on a face with Sharpie.


And there you have it, a beautiful Acorn Fairy. 


You can trim the skewer or leave it long to stick in your garden and have fairies floating around your yard.


These were so addictive, my girls quickly made lots of fairies to give to all of their friends. Now what to do with the rest of the Acorns?!


Tuesday, September 22, 2015

Foil Leaf Prints

The other day I mentioned how my children are embracing fall fever; and while I can stall them from carving pumpkins (for now anyway) I haven't managed to stop the endless natural treasures that get picked up every day. So the other afternoon we put the leaves to good use and created foil leaf prints.

I loved these because other than being super pretty to look at they also gave the kids a great opportunity to really examine the leaf. They raised questions from my first grader on symmetry, we examined the veins and discussed how a plant moves water from the soil to the tips of its leaves. We were able to compare different plants and trees leaves and after learning the names of the trees from which their leaves had fallen they were then able to go out on a woodland walk and identify the tress we walked under. Yes, more leaves came home!


You will need:

Cardboard (we used an old cereal packet)
Sharpies
Aluminum Foil
Fresh leaves


Step 1:

Place one or two leaves upside down on a piece of cardboard. Placing the leaves upside down gives a better imprint of the leaf veins in the foil paper than if you had done it right side up.


Gently cover the leaf with the aluminum foil and flip the cardboard over to fold the foil over around the edges on the back. You can secure it in place with tape if you like.


Step 2

Flip the cardboard right side up again and slowly rub with your fingers over the foil. Pressing gently you can smooth out the foil and the leaf print should begin to show through. If you have a young child doing this they may need help with smoothing out the creases to get a decent imprint without ripping the foil.


Step 3

Choose one color sharpie to color the background, this helps the leaf shape really pop out. My girls did this by themselves (it helps to be in  a well lit area so that you can see the outline clearly). The boys on the other hand being a bit younger needed help putting in an outline before they began coloring.


As you begin coloring you will also realize that some leaf shapes are far easier than others. For instance the Maple leaf was easier than the fern. Something to keep in mind if you have a little one doing this project.


The end result, beautiful don't you agree?


Friday, September 18, 2015

Hammer Painting


With the kids going back to school there came the first signs of fall. Leaves are starting to change color and fall from the trees, the golden rod is in full bloom and the farmers markets are starting to offer the wonderful squash and pumpkins that you only see between now and Thanksgiving. The local farm has its corn pit ready and we've already done the first of our apple picking and pie making. 

This also means that walking the dog now becomes a foraging exercise as I am handed 'special' leaves, acorns and pine cones that need to be saved 'forever'. (Well, at least until they've been through the wash cycle at least once if not twice in the machine!)

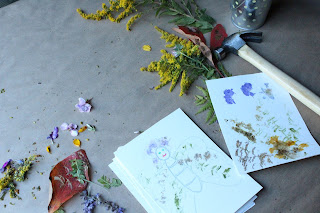
So after a walk earlier this week I decided to show my little guy something else to do with some of those treasures 'Hammer Painting'. I mean what little boy can resist the idea of being told he can hammer really hard to create.

The colors seen in fresh leaves and flowers come from chemicals called pigments. Painting in the earliest times always required making use of these natural pigments found in the plants around them.  This exercise was also then a great lesson in demonstrating how flowers and leaves store their colors in their leaves and petals, and how we can (through crushing the plant) use these pigments to create paint.

You will need:

Selection of flowers and leaves (Please don't pick wild flowers ours came from our yard)
Water color Paper (Or other art paper)
Baking Parchment Paper
Hammer
Board to go under picture or do it on a surface you don't mind being dented


Step 1

Place your watercolor paper on a board. Have your child lay out the flowers and leaves they have collected to make a picture, my older daughter actually drew the outline of a figure and then used the petals and leaves around the drawing to fill in the details.


Step 2

Place the parchment paper over the top of the flowers. My little guy found it easier if we held this paper in place with tape while he hammered to stop it moving around.


Step 3

Once you have had a hammering time, this may take a while if you have a four year old! You can pull back the parchment paper and dust of the flower scraps to reveal your masterpiece.


My daughter took hers out to the barn and preferred adding elements piece by piece to create her final picture.


I think my boys enjoyed this on a 'Mommy is letting me hit stuff' level while my daughter really enjoyed experimenting with which flowers left which colors and using things like ferns to create wonderful shapes within her pictures.


Wednesday, September 16, 2015

Return from Summer

Wow a 3 month break, that really is a good summer!

I finally have all my little people back to school and between the soccer, gymnastics and girl scouts its nice to find five minutes to myself to get back to my blog. How was your summer? Are you a lover of all the unstructured free time or do you prefer the routine of a school day?

I love having my kids home. Don't get me wrong they fight all the time and drive me crazy, but it also means I have time to be with my kids and explore the world with them on our terms in our time and I wouldn't change that for anything. We were lucky and took a great family road trip to PEI Canada, if you've never been I highly recommend it we saw some of the most beautiful untouched countryside you can imagine.


It was oh so peaceful and relaxing, and our kids had a blast. 


The best part was watching our kids connected with nature in a way that is impossible with busy modern life. Being in nature without all the modern distractions is just good for the soul.


And now back to crafting…