Friday, January 30, 2015

'Ginger bird' House Feeder


So I realize recently I've been a little preoccupied with bird feeders but they are such a great natural craft for this time of year because the birds are SO hungry and what can be better than watching a brilliant Blue Jay or scarlet red Cardinal on a cold snowy day. Plus, once you start feeding the birds they become reliant on you for food and as such you need to try and keep up feeding them until the warmer weather arrives, spring flowers bloom and food is in abundance. You will be rewarded with bird song and natures bug eaters during warm summer days.

Anyhow I made this with my Blue Barn campers before Christmas. It was such a cool, fun project  and a great alternative to the candy covered gingerbread houses we were making during the holidays, that when my little guy wanted to try too I jumped at the chance. I have just gotten around to sharing this with you now but we still have plenty of winter days left here in the Northeast to deal with. 

Here the kids are making the bird houses in our not so warm Barn in December,


You will need:

Graham Crackers
Hot glue gun
Peanut butter / Crisco Vegetable shortening
Edible Bird Friendly Decorations, examples: Bird seed, cranberries, raisins, sunflower seeds, cheerios, oats, pretzels etc 

Step 1 

Assemble base for bird house using the hot glue gun and the graham crackers. For camp I had these pre assembled for the kids. If you are worried about the glue you can make traditional icing for the houses in order to glue them together, I found that the birds pecked all the decorations and crackers and the glue was left behind.


Once the house base was assembled I glued it to a cardboard base.

Step 2

When choosing peanut butter v shortening both have benefits and maybe its just what you have on hand. If you have the choice though you might want to consider this. When I made these houses with the Blue Barn Campers I had used Crisco shortening to avoid any allergies, it worked great. However, if you have no peanut allergies to worry about we found the peanut butter acted as a better glue when I repeated the house making with D. I will say if you are doing this with a bunch of kids together you probably want to opt for the Crisco as it was a lot less messy and easier for the kids to spread.

So I gave D 3 little pots containing things we had on hand, bird seed, cranberries and raisins, pretzels. He did complain that the birds got the skippy peanut butter but I wasn't about to feed them the organic homemade!


He began spreading the peanut butter over the house, its pretty sticky and I had to help him a bit with this but the older kids at camp hadn't needed help with this. Just warn them not to press to hard, the crackers can break and having a spare house base is a good idea.


Once the peanut butter was spread they are free to decorate. D had a plan, he added a chimney and roof tiles.


Kids at camp also really enjoyed making these, I was honestly amazed at how long and how thoroughly they all worked.


D used more peanut butter on the cardboard to add a fence.


We also added lots of the spare birdseed inside the house, you can just see it in this picture.


So proud of his house, as were my campers, and such a great alternative to the candy cottages.


Placed outside in a safe place for the birds to discover their winter treat.


Thursday, January 29, 2015

Frozen Bubbles

So it is pretty cold here in the Northeast, not like Mid-west cold but we've not been above freezing for a while and as I waited to put the kids on the bus this morning the temperature was -2F (-17C), coming from Wales I think of that as pretty damn cold.

Now as often happens in our house getting out the door for the bus is a rushed panic as people suddenly remember notes that need signing, library books that need returning and gym shoes that need putting in backpacks. Once out the door chores still need doing, rabbits need feeding and eggs need collecting from the chickens. You would think that as the same routine is followed every day this would be a smooth operation but no, its like they are doing this for the first time EVERY morning. Maybe it's us but I don't think this will ever change, in fact if I try and create more time it just seems to get worse. Anyway, as we stand waiting for the bus this morning Bubba is emptying out his backpack on the driveway because he suddenly realizes I was right and yes it is cold and gloves and hat would in fact be a good idea. As this happens a bottle of halloween bubbles roll out.

Now my timing is often as good as the kids, I see the bubbles and decide 'right now' we need to try a science experiment I had seen knocking around Pinterest. Apparently when it is really cold out you can freeze bubbles, I of course tell the kids this and we just have to try it. Luckily for us the bus was late and we got to enjoy a beautiful morning activity.

Here are the bubbles. I was amazed, even with the cheap bubbles it worked.


So for this project all you need is bubble liquid and a bubble wand. As I looked it up later most sites had made their own bubbles, we have a recipe here. I also see the colder the temperature the better it works, for us at -2F only the bubbles that settled on the ground froze. Also it was not at all windy and I imagine this would be tricky on a windy day.

The frozen bubbles were awesome to look at, rather than popping they just slowly deflated. These first few pictures I took with my iPhone as we waited for the bus. After the bus came I took D outside to show him the bubbles and I took my good camera to get a few more pictures.


Soon the driveway was littered with frozen bubbles.


Instead of popping they looked more like smashed eggs over the driveway. We are going to have to try this again with homemade bubble solution, it's much thicker and will last longer. Just imagine using our giant bubble wands.


As a side note the kids also discovered something else as we waited for the bus. They are naming it 'snow chalk'. The driveway was so cold they were able to draw with lumps of snow. Pictures shared below, 


From hectic rush out the door to a calm beautiful way to start our day. I'm glad our bus was late today.


Wednesday, January 28, 2015

Printing on White Clay Hearts

I'm guessing the snow dance worked. From my previous post you'll remember here at the Blue Barn we have been wishing for a good snowfall. You know the road closing hunker down for days kind that means I get my kids home to have fun with, chili is in the slow cooker while we sled and then warm up with hot chocolate by the fire.

I obviously have more pull on the weather than I realized. Since that post we have had 6 inches of snow Saturday morning when we woke up and the 'big storm' that ended up not being quite so big for us yesterday. All in all it's looking pretty white outside and with the kids home from school for a day we had time to make a Valentines decoration I've had in mind for a while.

So you've been following my posts you'll know that I'm a big fan of white clay, you can buy the Crayola model magic kind, but here at Blue Barn we like to make our own, plus we were in the middle of a snow storm remember, anyway here is our link. Today though after making our batch I had the kids cut heart shapes for a Valentines banner.


You will need:

One batch of our white clay recipe
Heart cutters
Any thing which would leave a cool imprint, we used play dough tools and bottle caps
Paint (Printers ink, tempera paint or acrylic paint with work)
Roller

Step 1

Rolling out the batch of white clay cut as many hearts as you can from it, place hearts on a baking tray ready for the oven. Before you cook them remember to make a small hole through which to thread the string. At this point I also had the children create patterns on the clay with the various tools. Then we cooked them.

Step 2

Once they were hard and had cooled off we began printing on the hearts. For this we used a print block roller but I have done it before with my sons play doh roller so if don't have one improvise, you could even cover a rolling pin (or other cylinder object) in cling film and use that. Using the roller we started adding paint to our hearts.

The kids were so excited to see how the paint stuck to the raised pattern highlighting it for them.


I also brought out a few heart shaped stamps I had to use on some of the hearts we hadn't embossed before cooking.


They all looked so pretty when they were done.


Step 4

Once the paint was dry we threaded the hearts onto some bakers twine and strung by the fireplace. They turned out really nice and were a great project for a snowy day. 


Now for some sledding!


Wednesday, January 21, 2015

Growing Crystal Snowflakes


Last year here at the Blue Barn we had snow on the ground from December through to the end of March. I was snow crazy and looking forward to the green grass and warmer spring temperatures (which ended up showing up about May), it was a LONG winter.

Memories are funny things though and it is amazing how quickly you forget your cabin fever and look back on a winter with rose colored glasses. Yes, there was snow but that meant sledding, snowmen, snow forts and winter wonderland walks in the woods. This year we have had maybe 2 inches of snow tops. It has been a cold but dry winter and when it does warm up we get rain instead of snow and often ice rain. It sucks. I never thought I would wish for snow, but with four kids desperate to use new sleds from Santa and me wanting to improve my snow fort building from last year a good dumping of snow is being wished for here at the Blue Barn.

So here we are reading snow books, making small world snow scenes to play with and doing everything short of pumping fake snow into our yard.


It's no surprise then that when I dug out my books today to link to a craft I was choosing from a shelf selection that looked like this:


D and I settled on these two books,


The first book we read was The Snowy Day, a children's classic and perfect for the younger child. This book won the Caldecott Medal in 1963 and as Bubba always tells us "That means its good for kids"- and it is. A beautiful story taking you on a journey with a little boy as he experiences a city draped in snow. The simple illustrations make it an easy journey for children to follow along without even needing the story.

The second book is definitely geared more towards a slightly older child. Taking the reader on a journey of discovery and teaching the young reader exactly where snowflakes come from, how they form and why they are different. It is written in a very simple to follow way and accompanied by lots of beautiful photographs of individual snowflakes that give an amazing perspective on just how different snowflakes can be. D is just four and was able to follow along well, retained a few facts to share later in the day and loved examining all the different snowflakes.


Growing Crystal Snowflakes

This really is such a simple project to do, especially if you already have Borax at home (which we do because of all the slime we like to make). The crystal snowflakes are so pretty hanging in the window and it is a great mini-science experiment for the kids to try. It only requires a few minutes to put together and then you need to leave it overnight to see the effects.

You will need:

Borax
Pipe Cleaners
A glass
Wooden skewer / Pencil


Step 1

To begin I helped D create a snowflake shape out of 2 pipe cleaners and tied the top to a wooden skewer. Make sure that you don't create it too big, it needs to be able to fit inside your glass without touching the sides.


Step 2

Next D measured out 4 tablespoons of Borax and put it into the glass.


I added boiling water and he stirred the liquid until all the Borax had dissolved.


Step 3

Lower the snowflake (or any other shape you made) into the glass and have the skewer resting across  the top. The pipe cleaner should not be touching any of the sides.


Leave it to sit out the way, you don't want to move it as the crystals are forming. It takes about 8 hours, we left ours over night.


Step 4

Observe.

D liked to keep checking on his snowflake to see what was happening.


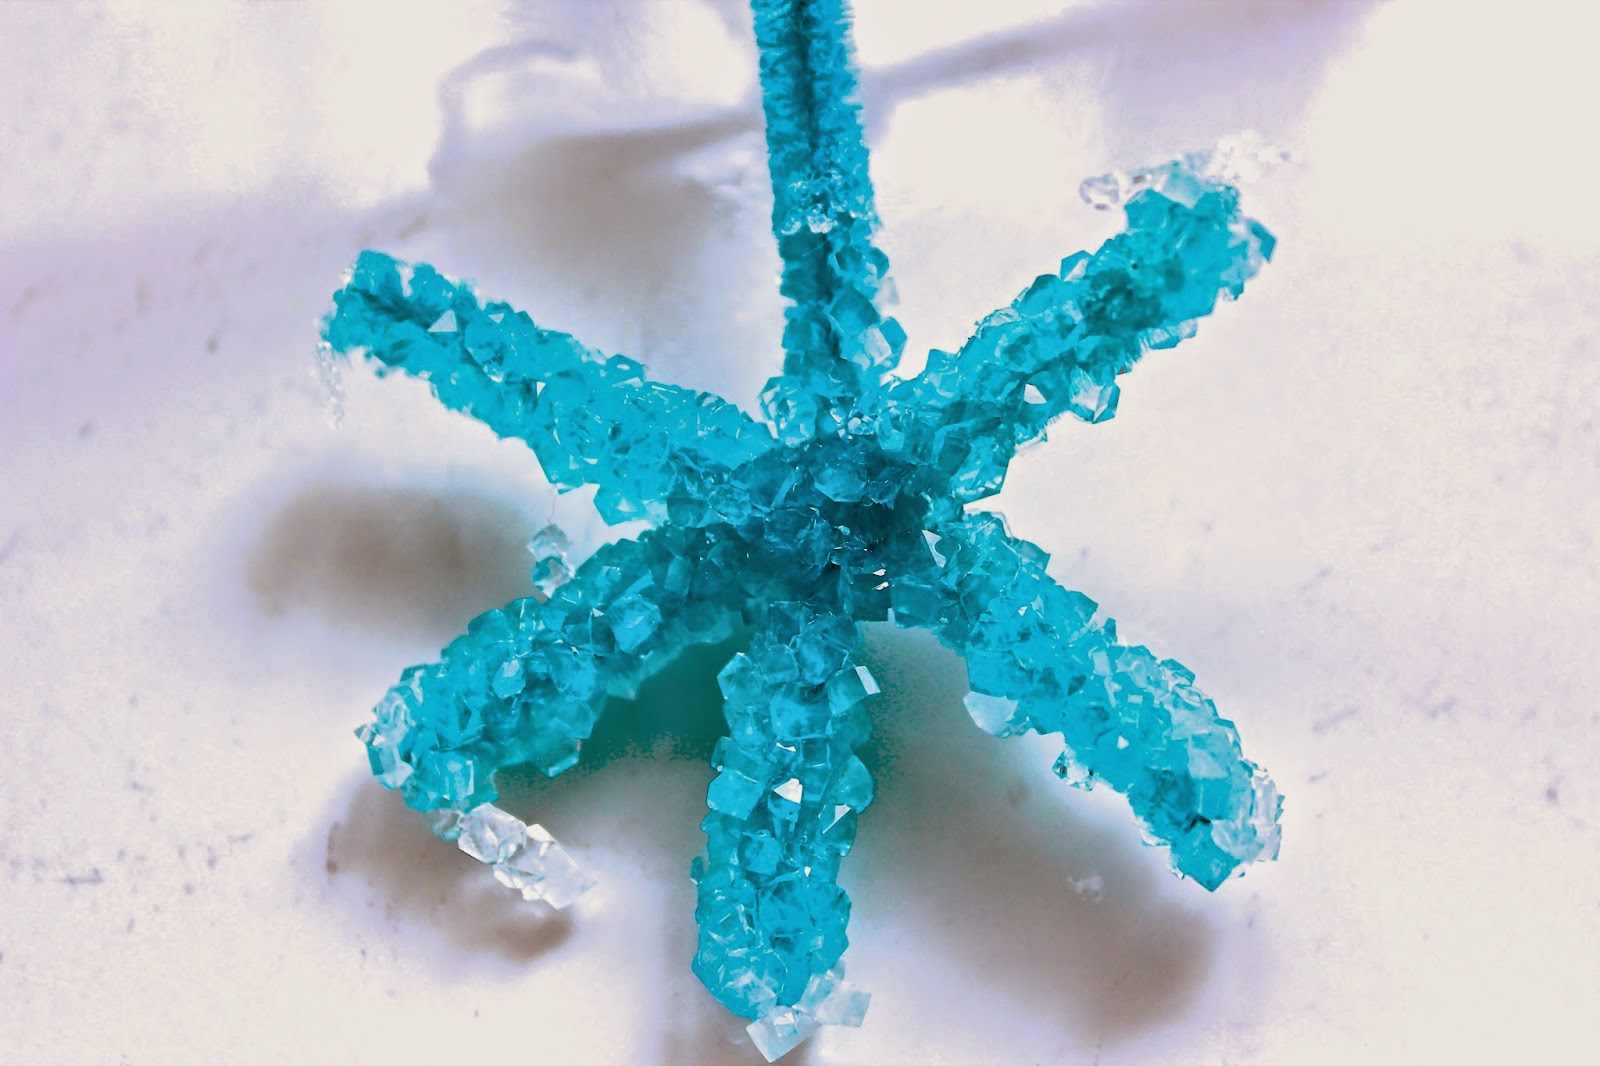
After an hour or so we could already see crystals forming on the edge of the glass and on our snowflakes.


By the next morning the crystals had formed and we were able to lift out the snowflake to have a good look it.


They were so pretty, 


And when you looked closely you could see the individual crystals that had clung to the pipe cleaner and which really resembled the snowflake pictures in the book. 


Maybe these snowflakes hanging in our window will encourage the real snow the kids desperately want to fall.