Tuesday, December 4, 2018

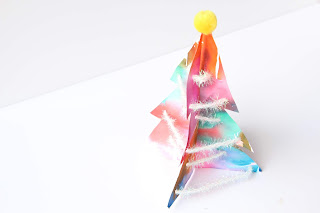
3D Christmas trees decorated three ways


These bright and colorful trees were created as our contribution to 'Craftmas 2018'.  If you haven't heard about Craftmas let me fill you in a minute, its 12 days, 24 creative bloggers getting together to bring you all the Holiday crafting you'll need to get you through the season over on Instagram.  

I began by thinking we would create a 3D threading Christmas tree but as we began playing around it was fun to take his project into a couple of different directions so I'm going to share all three simple ways to decorate your 3D tree below. Pick your favorite or make all three!

You will need:


Colored or white card stock paper
Scissors
Glue
Cut out our Tree template


Depending on which tree:

Colorful washi tape
Sequins / Pom poms
Bleeding tissue paper
Ribbon/parcel string


Tree type 1 - invitation to decorate a tree

Using the tree template cut the two tree pieces out of some green card. Cut one tree up from the bottom and the other down from the top, so that they can be slotted together.  


Give your little one something to decorate the trees with sequins, buttons, beads, pom poms etc and some glue. Decorate one side of each tree and then when they are dry flip them over. to do the other side.


Once dry slot the two pieces together and top by gluing a pom pom onto the top.


Tree type 2 - Washi tape Christmas tree

We chose to use some plain colored washi tape to create a warm colored (red, orange,yellow) and cold colored (blue, green, purple). But any wash tape would look pretty.

To begin take a piece of white cardstock, tape all over one side.


Once one side is covered flip it over and tape the other side.


Once the two sides are covered in tape use the tree templates to cut out two tree shapes from the taped up card.


Again cut a slit up from the bottom in one tree and down from the top on the other, then slot the two pieces together.


Don't forget to add a star aka Pom Pom to the top of your tree


Tree type 3 - Bleeding tissue paper trees

 For our final tree I broke out the bleeding tissue paper, this is always a fun one with the kids, they love the magic of the dye transferring to the paper with the addition of water.  I precut the tissue paper into squares and once again sorted it by warm and cold colors - totally optional but by sticking to color families it helps to avoid 'muddy' end results.

Have the children paint one side of the card paper with water, then lay the tissue paper squares onto the wet paper. Once it is dry remove the squares, flip the sheet of paper over and repeat on the opposite side.


 Once both sides are dry and you have removed all the tissue paper you should be left with some pretty marbled looking paper. Lay the tree templates over the dyed paper card stock and cut out two tree shapes. Remember to make one cut on each again - one up from the bottom and the other down from the top.


On this 3D tree we also punched holes around the edge of the tree, one in each corner and one at the center of each triangle. Once you have made the holes slide the two pieces together again.


Take your decorative yarn or parcel string and have your child thread around the holes in the tree, this is a great exercise in fine motor. When they are all done threading add a pom pom to the top of your tree and your all done.  


Which one is your favorite? I think its so hard to pick just one I recommend making a whole forest of colorful christmas trees.


Be sure to check out the rest of the Craftmas fun over on Instagram, and thats us wishing 
Merry Craftmas to all! 

Monday, December 3, 2018

Decorate Santa's Beard


So we've all seen the glitter beard trend right? Well why not Santa? He's feeling left out and needs a little jazz and sparkle this year so lets decorate his beard! This is a super easy project to set up and your little one will enjoy picking out special pieces to Santa the best beard in town. Remember to print one for yourself too - crafty christmas fun is not just for kids plus what can be better than sitting with your little one playing christmas music and getting your craft on.


You will need:


Download and print the Blue Barn Santa Printable

Puffy paint - we mixed 1 part white glue and 2 parts shaving foam to make ours

Decorations - sequins, ribbons, straws, beads, glitter, buttons, pom poms (really whatever you have at hand)


Step 1

Mix up the puffy paint and apply paint liberally to the areas you wish to decorate, his beard, maybe hat and eyebrows too it you want him to really sparkle!


Step 2

Set out the pieces you have to decorate the beard with.  Remember scissors to cut ribbons and straws etc. Encourage your children to  pick out the pieces and add them to the foamy paint.


Then once you have added all the sparkle leave them flat to dry, the puffy paint takes about 24hrs to dry but it will dry all puffy when it does and then you can hang it on the wall for Santa to see on Christmas Eve.


Wednesday, November 28, 2018

Christmas Countdown 2018


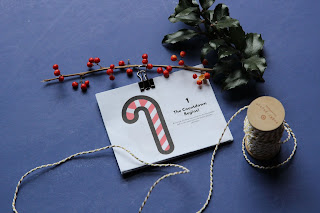
Can you believe December is right around the corner? I am in complete disbelief because November shot by quicker than grease lightening! I may still have 90% of my shopping to do, christmas cards to write and a tree to pick and decorate but guess what? I have finished our Christmas Countdown Calendar (priorities right?) and as so many of you said how much you loved following along with last years countdown I thought I would share this years with you all too. Its revamped, we kept some of our favorite pieces because my kids LOVE traditions and I've added a few new surprises.  Just like last year you can download it for free right here and now.   Your going to want to pop back to this blog for a few of the activities as we go through December because I'll be adding a couple blog posts to go along with a couple of the days - I will pop the posts up a day or two before you need the information and share them on Instagram too so follow along with the #bluebarnchristmas hashtag.

So what do you need right now? Well all you need is this link to get yourself a copy of our countdown printed 4 to page ready to cut out and add to your advent calendars or alternatively print it out slightly larger and create a desk calendar by printing this PDF instead with the days 2 to a page and slightly larger.


Below is an example of our daily desk prompts.


And here is the smaller size printed mounted on to a board with tiny pegs to create a daily countdown.


So what do we have this year? Everything from decorating Santa's beard to creating your own kid friendly wrapping station to visiting an elderly neighbor and spreading Christmas Cheer. And remember its not meant to be stressful these ideas are fun prompts to create holiday memories, if you miss one day because your busy or your little one just isn't interested don't stress about it just save it for a different day or even file it away for a cold day in January and dig it out then instead!

December 1

Print out your Blue Barn Christmas Countdown and find a way to display it for the kids.

December 2

Write a letter to Santa, set out paper, stickers, pens etc and have your child write Santa their wishes. Don't forget to mail it!

December 3

Whip up a big batch of Peppermint Playdoh, add rolling pins, cookie cutters, sprinkles the works its time for a cookie workshop.

December 4

Decorate Santas beard. You've seen the new trend for glitter beards right? Well why not Santa, pop to the Blog December 3rd because I'm sharing a fun blog post complete with a printable to give Santa the jazziest best beard in town.


December 5

This was one of my kids favorites from last year, I packed up a big thermos of hot chocolate and took it into the woods along with a blanket, candy canes and marshmallows. It doesn't have to be the woods, your backyard, the beach, a local park just get outside if you can. And if its hot and sunny where you live why not replace it with chocolate  ice-cream and pretend its super hot or if its raining make a hot chocolate picnic somewhere unusual in your house.


December 6

Planting Paperwhites - my favorite Christmas flower and a great activity for children to see the bulbs grow into plants because its quick and the roots can also be seen. So they they can get an idea of what goes on above and below the soil. To see how to plant paper whites visit this blog post of ours.


December 7

An act of kindness. So important for children to think of others during this holiday season so they can truly gain an idea of giving. Have your child think of a kind act for a neighbor or a stranger.  Cant think of something to do I like to have my children pack a Samaritan Shoe Box for more info see this website in the US.

December 8

Decorate a Christmas tree.  Why not have a small tree your children can decorate all by themselves? Don't have a small tree try drawing one on paper for your children to color and decorate with stickers, beads, pipe cleaners, glitter etc.

December 9

Christmas card making.  Set out card and all the bits to create some gorgeous homemade cards for the special people in your lives. Handmade is always best.

December 10

Dress an elf today. Check out our fun blog post today as Elfie gets a set of new clothes.

December 11

Holiday Slime Time, so my kids wouldn't let a christmas craft marathon pass by without a little slime play. Red or white, glitter or candy canes a slime making sensory session is needed.

December 12

Christmas books. There is nothing better than curling up with a good book, so take a trip to your local library fill your bag with all the holiday books you can find and then come home, snuggle up and have a big readathon together.

December 13
A candy cane bath. Another favorite from last year, run a warm bath, add a few drops of peppermint oil and some bubble bath. Then quickly pop in some red glow sticks before turning out the lights! It won't disappoint!

December 14

Spread Christmas cheer. Carol singing, visiting an elderly neighbor and baking them some Christmas cookies, or maybe just wishing everyone that passes you by a Merry Christmas! 


December 15

Decorate a gingerbread house, store bought or homemade spend time as a family decorating it together. 

December 16

Create your own Christmas instruments, scented sleigh bells, or nutcracker drum. Then sing christmas songs loud for all to hear. 

December 17

Set up a wrapping station for your little one tissue paper, tape and scissors along with objects to wrap up, blocks or small toys. let them wrap and unwrap as much as they like. Have older kids? Why not put out some ribbon, card, stamps and ink, pens, sprigs of holly etc as an invitation to create their own gift labels and embellishments.

December 18

Snow Play, no snow no problem mix up a batch of fake snow and set up your own North Pole Winter wonderland to play with.

December 19

Take a walk or stroll around your neighborhood after dark and take in all the Christmas lights. 

December 20

Lets feed our feathered friends today, try your hand at making some simple feeders feeders out of pine cones or go for something more fun and create one of these gingerbread bird houses.

December 21

The solstice is here, lets create a solstice candle if you'd like to read how we make ours see how to here

December 22

Its time for a Christmas movie, pick a good one, get your PJs on, pop some popcorn.

December 23

Time to mix up some reindeer food - we like oats, raisins and a little bit of fairy dust (glitter) be sure to sprinkle it outside your house on christmas eve so the reindeer know where to land!

December 24

Yippee its christmas eve, time to leave Santa a special treat to eat. Take one last look out the window for his sleigh and get an extra special early night.

MERRY CHRISTMAS ONE AND ALL

Sunday, November 18, 2018

Create a Turkey or Peacock collage

So for those of us in the United States I couldn't let November slip by without a little turkey craft.  However, knowing that many of you will not be feasting on turkey and stuffing this week I thought I would include an extra peacock/swan bird template so that you can totally join in the fun and create a bird too using this really cool transparency film method. 

So these super duper awesome feathers were created using a really fun process. The process involves painting and color mixing first on transparency sheets. The painting of which are just SO good to paint because the paint glides onto the smooth surface so effortlessly the kids will have a great time swirling and splurging all the yummy colors together. But what I like best about this collage is that we end up using the reverse side of the film so you get these really cool color mixing reverse brush strokes which are lost usually when you paint on paper.

Anyway not to prattle on too much please check out our super simple bird collages below, which by the way I am totally in love with. 


You will need:


Paper
Transparency paper
Bird Template
Scissors 
Glue
Acrylic Paint

Step 1

To begin have your child paint with acrylic paint all over the transparency film. This is a great opportunity to practice color mixing - but remember only use two of the primary colors unless you want a brown sludge. For example yellow-red-orange or red-blue-purple or yellow-blue-green. Once you have painted a couple of films leave to dry completely - this might take overnight especially if the paint is thick.


Step 2

Paint a sheet of white paper in a solid color we chose red for our turkey but any color would work. Once your paper is dry take our template which you can find here and cut the shape that you would like to use.  


Step 3

Once your painted transparency is dry cut lots of feather shapes out of it. If you have younger children you might want to do this for them. You really will need a lot of feathers to create one bird, try and cut the feathers so you get a range of shimmery color on each feather.


Step 4


Glue the turkey or peacock body to the center of the piece of plain paper. Try not to glue right to the edge of the body shape as you'll need to tuck feathers in underneath the edge in a minute.


Step 5


Begin by tucking in the feathers around the edge of the shape. I like to glue the feathers paint side down, this allows all the wonderful color mixing swirls to show through giving the feathers some texture. When you add the feathers be sure to overlap them slightly.


Once you have begun the first layer build up layers behind tucking the base of the feathers behind as pictured below.


Build up to fill all the space behind your turkey. When you run our of feathers give your bird a face - we used some sticker eyes and an off cut of the transparency film for a beak but really anything works - you could have you children draw on the face.


Our finished turkey, heres wishing those that celebrate a very, 

Happy Thanksgiving


And for those that don't celebrate why not use this method to create a Swan or a Peacock, who says turkeys get all the fun!