Wednesday, February 18, 2015

Creating Maps


Ever since I was little I have loved maps. I remember listening to my grandfather (who worked for a UK map maker) explain how they measure the peaks and gradients of hills, how they outline the coastline and plot on the roads. He taught me how to read a map to help me find my way. We would go out walking on the hills of Wales; he would show me trig points and let me use his compass to work out which way was north. Maps he said were photos of places you haven't been.

In our modern world where your smart phone or car GPS directs you to your destination we no longer have use for paper maps in the same way. We can sit in our living room and use Google earth to see satellite images of places we want to visit. I recently read an article that stated one skill today's babies will never learn is map reading because they have no need. After reading that we took a family hike with a paper trail map and a compass and I had my kids lead the way, they loved it.

Despite this modern world there is something still magical to me about a map and so when I came across the following book in a book store recently I was enchanted. 


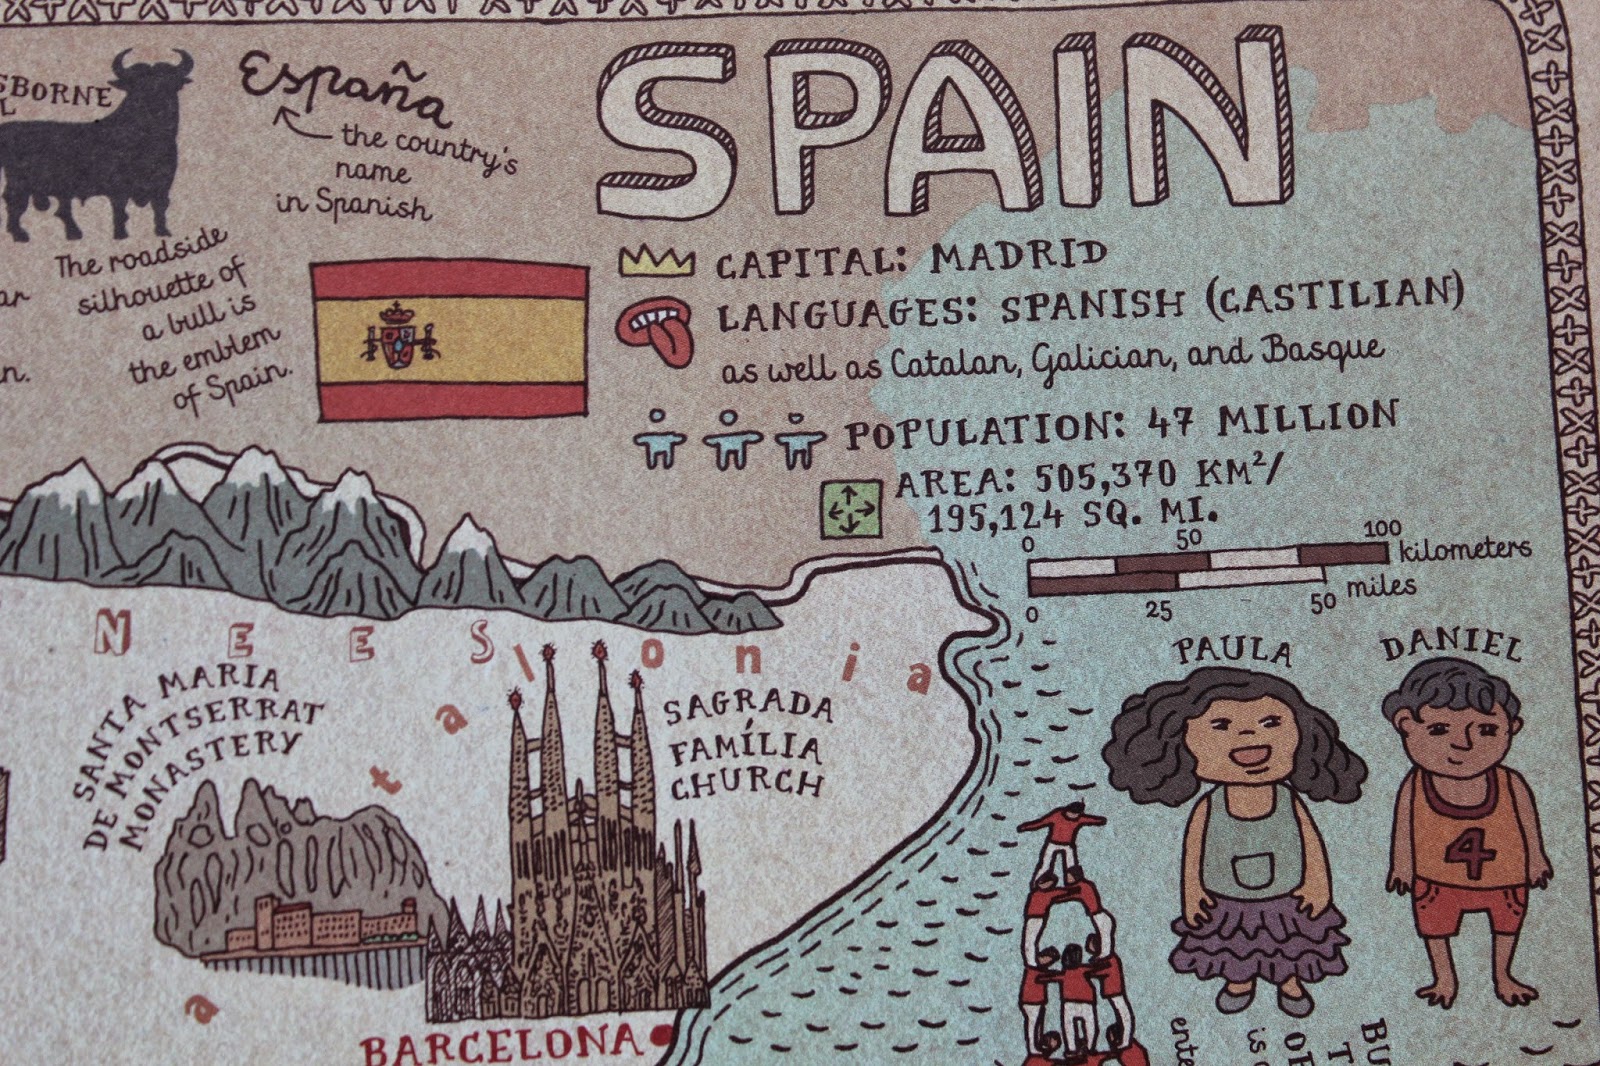
MAPs was written by Aleksandra Mizielinska and Daniel Mizielinski

This book has quickly found its way to permanent fixture on our coffee table where kids and adults alike have sat and enjoyed looking through its beautiful illustrations and in turn my children are learning a little more about the world we live.

The book breaks the world down just as a real Atlas would by continents.


The countries of the various continents are then laid out in a very kid friendly manor with geographical interest points.


They also include the flag, population size and area alongside the countries name.


I think my favorite part is the animals, foods and native plants they highlight for each country.


After looking through this book again the other afternoon we decided that it would be fun to invent our own islands and create a map to show people what they would find there. We used a map template I had found here


You will need:

Plain paper or map print out
Pens
Teabag
Oven set to 170 F

Step 1

The children began by drawing out their islands, they all got so excited talking about what you would find.


We talked about mountains, rivers and caves. Then as they do in the Maps book we talked about who might live on their island, which creatures/people. What plant life? What might help us know if it has a cold or warm climate? How do you know what is water? Of course we ended up with trolls and transformers, cats and unicorns, pirates and fairies.

Then looking back at the Maps book I showed them how each country has its own flag so they began designing flags for their countries too.

Step 2

We had decided early on that these were going to be secret islands that they were only just discovering and so as such we decided to age our maps to make them look like they came from a time long past.

This step is really easy but needs an adults help.

We began by using an old tea bag to age the paper (if your coffee drinkers coffee grains will work too).


Step 3

Once your paper is covered in tea you can scrunch it into a ball to get creases in it. Then slowly flatten it out and place it in the warm oven on a shelf. For younger children an adult will need to help here.


Step 4

Once dry I gave the children the option of me burning the edges to age the maps more. This should be done over a sink by an adult. D didn't want me to burn his after he saw the others being done.


Once I had burnt the edges the kids removed any loose black pieces of paper from the edges.


Step 5

Our final maps,


Apart from how well the maps turned out I think my favorite part of the whole exercise was once they had finished. The maps themselves gave way to them all making up stories to go along with their Islands and then they spent the rest of the afternoon finding the maps and reenacting each others stories, what a creative way to spend a day.




Monday, February 16, 2015

Hot Rocks Art


Over at the Blue Barn this past Friday we had lots of fun during camp on a cold snowy day with these beautiful rock creations. They were super simple to do and the kids all created such pretty creations I decided it worth sharing here. We were limited by the number of rocks we had on hand as our yard and all rocks are under 2 foot of snow so we had to use our summer rock collections (luckily for me, my kids are all rock hoarders and I had a bucket in the garage) but we will absolutely be repeating this in the warmer weather.

You will need:

Rocks (washed)
Crayons
Oven to heat rocks


Step 1 

Heat the rocks, we did it on the top of our old wood burner and they got super hot but you can also do this in the oven. Heat oven to about 200 F.


After rocks are warm have an adult remove them with a towel. Warn kids that the rocks are warm, this is not a project for young children who do not understand 'hot'. Place rocks on a heat proof surface and let the kids create.


Step 2

Using the crayons 'draw' your design onto the rocks. The heat of the rock should be enough to gently melt the crayons. If the rocks are not melting the crayon you can place them in the oven for a little longer. Some of the kids at camp drew a picture others simply enjoyed watching the crayons melt to create a marbling effect of swirly colors.


Once the designs are finished leave the rocks to cool down fully. The effects were gorgeous.


The kids loved this project, the only thing I would say is make sure you have plenty of rocks and crayons because they will all want to do more than one.


Monday, February 9, 2015

Foil Art


Today here at the Blue Barn saw us with yet another snow day for the kids. I'm sure everyone has seen Bill Murray in Ground hog Day; well thats life here in our little town this winter. You wake up to the school district ping of another snow day or delayed start, more snow, sleet and ice rain. 

Today's snow day was not the sort where you end up sledding down a hill or building a snowman, but more the sort that you never quite make it out your PJ's. As such I had four kids home to entertain. By 10am we had already made and iced cupcakes, completed the necessary 80 Valentines and one school project that had been neglected over the weekend. By 11am they had exhausted the dress up selection and were chasing each other around the house with swords and light sabers. 

For my own sanity I decided to test out a new craft idea on them. I had seen it kicking around the internet; it seemed relatively simple, plus I had all the supply's, hurray.  Two out of the four kids jumped at the idea and as dividing the masses often leads to peace and tranquility (well within reason right?! We are talking four children still under one roof) I went ahead. Whilst my middles continued to play imaginary games that seemed to involve emptying out every toy bin in the house the biggest and little got crafty with me. Fun.

You will need:

Sharpies
Aluminium Foil
Hot Glue Gun
Card (we used the inside of a cereal packet) 


Step 1

Draw a simple design on the card. You will be tracing this design with the glue gun so don't have lines too close together. With younger children the larger areas are easier for them to fill.


Step 2

Trace the lines with the hot glue gun. If you don't have a hot glue gun you could instead glue a strand of yarn into the pattern you want.


Step 3

Take a fresh piece of foil and carefully flatten it over the pattern. Press down carefully to get an embossed look. Try not to rip the foil. Looby (Aged 10) was able to complete all this herself but I helped D (age 4) with both the hot glue gun and foil part.


Step 4

Once the foil has been flattened over the front of the card tuck any loose edges behind. Then using the sharpies color all the sections on the foil. Do not color over the raised lines.


Here is D's mugshot with his finished piece.


Looby REALLY enjoyed this and it kept her busy for a few hours of the afternoon.


The effect once they are colored is lovely and they are really brightening up our walls on this gray winters day.


Thursday, February 5, 2015

My Little Town


For Christmas this year D had requested in his letter to Santa the following items; tiny trees, a road, a rock and a truck. He told us, his teachers and both Santa's he met in the run up to Christmas. Luckily Santa came through including the trees, rock and truck along with a roll of road tape, we had a very happy boy.

Today when he pulled out the building blocks and road tape he wanted to build a small town for his car. As he began building with his blocks I decided to expand his town with some new houses. This proved to be a really fun free way to reuse the trash to create a new play world with a little imagination.

You will need:

Raid the recycling for a few boxes
White paper, we used our roll of Melissa and Doug easel paper
Scissors and Tape


While D was busy setting up his blocks I wrapped the boxes for him.


He was super excited and keen to get drawing once I told him what the boxes were for. I draw the first house to help him see what I meant but then he was very insistent to do the rest all by himself.


I was amazed at how carefully he thought about his houses and how carefully he drew on the details.


Once done he stood them all up and then built up his blocks to finish the street.


His little town kept him busy for the rest of the afternoon. As is often the case the simplest ideas much like the simplest toys are the best, and what can be easier than blocks.