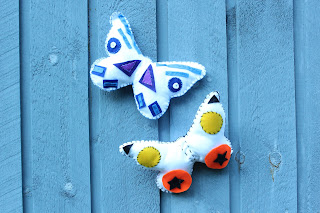
My girls have tried many of the projects from her wonderful 'Sew Together Grow Together' downloadable book and love them all. They are always so happy when they work through to complete something all by themselves and can't wait to show it off. So when she asked us if we could come up with a simple sew a softie project for kids we jumped at the chance.
Our inspiration for this project came from the many butterflies we have currently been enjoying in our summer garden. We like to avoid pesticides and try to encourage lots of bee and butterfly friendly flowering plants to the yard so our outdoors is buzzing. Even our goats are helping the insects as they've left us a huge milkweed patch in the field that the butterflies love. Its so peaceful to sit and watch the many colors and patterns that nature provides.
We recently registered our lot as a Monarch Safe Spot on the website www.monarchwatch.org its a great source for information on how you can help the beneficial insects and encourage more to your yard.
Above is a Butterfly enjoying our field milkweed.
So if you'd like to make your own butterfly softie here is what you will need:
Various colors of felt
Embroidery thread
Scissors
Filler
Needle
Butterly template - draw your own or print an online template there are lots to choose from
Step 1
Once you have a printed template cut it out and use it to trace the shape onto a piece of felt.
Then pin two pieces of felt together, the one with the butterfly shape drawn on top and cut out the butterfly shape. You will be left with 2 identical pieces.
Step 2
Using other colors of felt cut out shapes to decorate your butterfly, we went for simple geometric shapes, circles, stars and triangles.
Step 3
Begin sewing your shapes onto one piece of felt, this will be the front of your butterfly. You can either sew the shapes to the felt in a single point through the center as you see here (this is much quicker for young children with shorter attention spans).
Or you can sew around the outside of the shape, in and out as shown below, this will hold the shape on more securely and flush but does take longer and may prove more difficult for first time sewers.
Step 4
You can also use the embroidery thread to decorate your butterfly without any extra felt. Here my daughter used a simple running stitch - a stick that just goes in and out) to create the body of the butterfly.
Step 5
Once you are happy with how you have decorated your butterfly it is time to sew the front piece to the back piece of felt.
Take the front piece and line it up with the second (back) piece of felt. Now take a long piece of thread, tie a knot in one end and begin sewing the two pieces together. We chose to use a blanket stitch to seal the sides but a running stitch will also work just fine.
Remember to leave a small space to stuff the butterfly.
Once you have sewn almost all the way around stuff the butterfly, we used a poly fiber stuffing but you know you could use anything from old t-shirts to plastic bags. Once stuffed close up the space and tie off the thread.
And there you have it one geometric shape butterfly ready to flutter around your.
And a happy summer camper thats made something special.
Make sure you check out colouredbuttons.com, her sew a softie campaign and all the other wonderful sewing projects offered up this July.


